- Frist turn on the raspberry pie settings sudo raspi-config
- Then the options appers select the third interface option
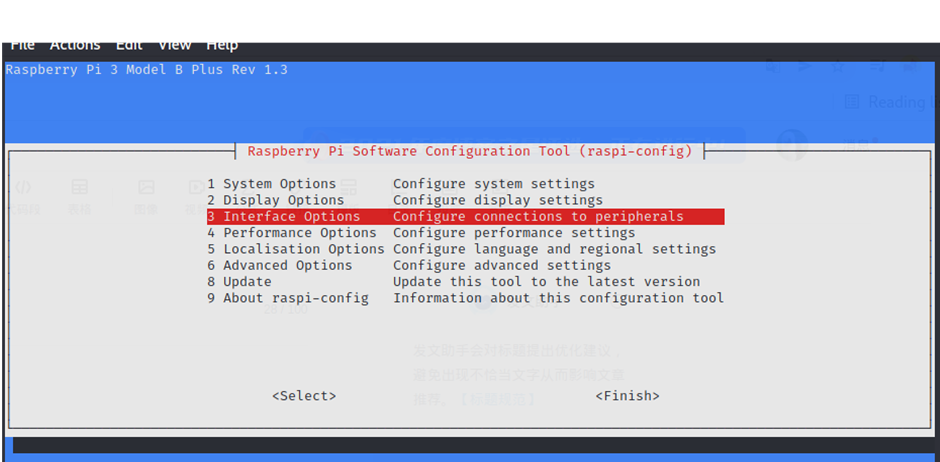
3. After turning on all the options and restarting raspberry pie

4.vcgencmd get_camera

5. You can run the python picamera program and execute raspistill
For example raspistill -o /home/pi/Desktop/first.jpg
So, you’ve embarked on the Raspberry Pi journey and hit a snag with Python picamera and raspistill errors? Fear not, dear Pi-enthusiast! You’re not alone in this bumpy ride. This article is your lifeline to solving these pesky problems, with a dash of humor to keep you from pulling your hair out. Let’s dive into the world of troubleshooting and emerge victorious, shall we?
![[Solved] How to Solve Python picamera and raspistill error](https://coderscanteen.com/wp-content/uploads/2024/06/How-to-Choose-the-Right-Car-Insurance-Policy-for-Your-Needs-Best-Guide-in-2024-50-1024x553.png)
Raspberry Pi is a delightful little gadget, isn’t it? It’s like a Swiss Army knife for tech enthusiasts. You can turn it into a mini-computer, a home automation server, or even a surveillance system. The possibilities are endless! However, as with all great things, there are a few bumps in the road. When you’re working with Python picamera or raspistill and suddenly errors start popping up, it can be frustrating. But worry not! We’re here to solve those errors step by step.
Understanding Python picamera and raspistill
Before we jump into troubleshooting, let’s quickly understand what Python picamera and raspistill are.
- Python picamera: This is a Python library used to control the Raspberry Pi camera module. It provides a simple interface to capture images and videos.
- raspistill: This is a command-line tool that comes pre-installed on Raspberry Pi OS. It’s used to capture still photographs with the Raspberry Pi camera module.
Common Errors and Their Causes
Let’s get into the nitty-gritty of common errors you might encounter and their potential causes.
- Camera Not Detected
- Error Message:
Camera not detected. - Cause: The camera module might not be connected properly or there might be a hardware issue.
- Permission Denied
- Error Message:
PermissionError: [Errno 13] Permission denied: '/dev/vchiq' - Cause: The user running the script doesn’t have the necessary permissions.
- Resource Busy
- Error Message:
mmal: mmal_vc_component_enable: failed to enable component: ENOSPC - Cause: Another process is using the camera, or it wasn’t released properly after the previous use.
- Invalid Argument
- Error Message:
mmal: mmal_port_parameter_set: failed to set port parameter: EINVAL - Cause: Incorrect configuration or invalid parameters passed to the camera.
- Out of Memory
- Error Message:
Out of memory - Cause: Not enough memory available to execute the command. This could be due to multiple applications running simultaneously.
Troubleshooting and Solutions
Now that we know the common errors, let’s look at how to fix them.
1. Camera Not Detected
This is one of the most common issues. Here’s how you can fix it:
Check the Connection:
- Make sure your Raspberry Pi is powered off.
- Carefully connect the camera module to the Raspberry Pi. Ensure the ribbon cable is firmly connected to the CSI port (Camera Serial Interface).
Enable the Camera:
- Boot up your Raspberry Pi.
- Open a terminal and type:
sudo raspi-config- Navigate to
Interfacing Options>Cameraand enable it. - Reboot your Raspberry Pi.
Test the Camera:
- Open a terminal and run:
raspistill -o test.jpg- If the camera is working, you should see a preview on the screen and a
test.jpgfile will be created.
2. Permission Denied
This issue usually arises due to insufficient permissions. Here’s how to tackle it:
Add User to Video Group:
- Open a terminal and run:
sudo usermod -aG video $USER- Log out and log back in to apply the changes.
Check Permissions:
- Make sure
/dev/vchiqhas the correct permissions:
ls -l /dev/vchiq- If necessary, adjust the permissions:
sudo chmod 777 /dev/vchiq3. Resource Busy
This error indicates that the camera is being used by another process. Here’s how to fix it:
Identify the Process:
- Open a terminal and run:
lsof /dev/video0- This will list the processes using the camera.
Kill the Process:
- Use the
killcommand to terminate the process:
sudo kill -9 <process_id>- Replace
<process_id>with the actual process ID.
Restart the Camera:
- Sometimes, a reboot is necessary to free up the camera resource:
sudo reboot4. Invalid Argument
This error typically occurs due to incorrect settings. Here’s how to resolve it:
Check Configuration:
- Verify the parameters you’re passing to the camera.
- Refer to the official documentation to ensure you’re using valid arguments.
Update Software:
- Ensure your software is up to date:
   sudo apt-get update
sudo apt-get upgrade- Update the firmware as well:
sudo rpi-update5. Out of Memory
Running out of memory can halt your camera operations. Here’s how to manage memory better:
Close Unnecessary Applications:
- Close any unnecessary applications to free up memory.
- Use the
topcommand to monitor memory usage:
topIncrease Swap Space:
- Increase the swap space to provide more virtual memory:
sudo nano /etc/dphys-swapfile- Change
CONF_SWAPSIZEto a higher value (e.g.,1024). - Restart the swap service:
sudo /etc/init.d/dphys-swapfile restartAdvanced Troubleshooting
Sometimes, the usual fixes might not work. In such cases, advanced troubleshooting steps can help.
Checking Logs
Logs can provide valuable information about what’s going wrong.
View Logs:
- Open a terminal and check the
dmesglog:
dmesg | grep -i camera- Check the
syslogfor any camera-related errors:
cat /var/log/syslog | grep -i cameraReinstalling Software
If all else fails, reinstalling the software might help.
Reinstall Python picamera:
- Uninstall the existing library:
sudo pip uninstall picamera- Reinstall it:
sudo pip install picameraReinstall Camera Firmware:
- Update the firmware:
sudo rpi-updateKernel and Firmware Issues
Sometimes, kernel or firmware issues can cause camera problems.
Update Kernel and Firmware:
- Ensure your kernel and firmware are up to date:
sudo rpi-updateRollback Firmware:
- If a recent update caused issues, rolling back might help:
sudo rpi-update <commit_hash>- Replace
<commit_hash>with the hash of a previous stable version.
Must Read:
FAQs
Q1: Why is my Raspberry Pi camera not detected?
A1: This could be due to improper connection, camera module not enabled, or hardware issues. Follow the steps in the “Camera Not Detected” section to troubleshoot.
Q3: What should I do if another process is using the camera?
A3: Identify and kill the process using lsof and kill commands. Refer to the “Resource Busy” section for guidance.
Q4: How can I fix invalid argument errors with raspistill?
A4: Ensure you’re using correct parameters and update your software. Check the “Invalid Argument” section for more details.
Conclusion
Congratulations, you made it to the end! By now, you should be armed with all the knowledge you need to tackle Python picamera and raspistill errors on your Raspberry Pi. Remember, troubleshooting is a bit like detective work – it requires patience, attention to detail, and sometimes a bit of trial and error. But with this guide by your side, you’re well-equipped to solve these issues and get back to your Raspberry Pi projects.